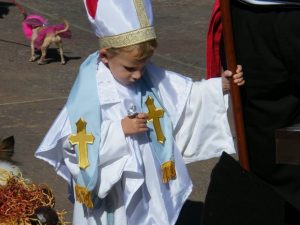
How to Make a Pope Costume At Home
How to Make a Pope Costume
To make a DIY popes robe, is quite easy. However, it requires basic sewing skills. So if you have a religious play, a project or a costume event and you would like to make a robe, these are the things you will need.
BASIC REQUIREMENTS FOR A POPE COSTUME
You need:
- Twin white sheet: if you have a plain white sheet that isn’t useful at the moment then that would do.
- 8-inch bowl: A plastic, ceramic or any kind of bowl would do as long as it is an 8 inch bowl.
- Scissors: preferably if you have a big scissors, it would do the work well. A small scissors can equally do the task however, you may not enjoy using it. So for ease in cutting, the big scissors will do.
- Sewing Machine: This is equally essential. For any sewing tutorial, you will need a sewing machine for smooth stitching.
- Air-soluble fabric marker: This is important when it comes to measuring and marking your fabric for easy cutting.
- Yardstick
- Pins
- Iron
- White thread: for sewing.
- Stapler
- White poster board
- Fabric markers
- 5 by 7 printout design of a cross.
- Gold craft paint
- Paintbrush
- Pins
METHOD
Step 1
Fold the sheet into half horizontally. Smoothen the sheet so you do not have any wrinkles.
Step 2
Fold the sheet in vertically by bringing the top left corner of the sheet, over to match the top right corner.
Step 3
Place the 8-inch bowl upside down on the left ( top) corner of the sheet. This will be the folded corner.
Step 4
Then, position the bowl to about 3 inches in on the fabric. After that, you, trace around it.
Step 5
Then gently remove the bowl and cut along the line.
Step 6
Open the sheet and then, check to see if there is a hole in the middle of it. Of there is, then the hole will be for your head.
Step 7
Then, fold the sheet in half horizontally. This is done by bringing the short sides together. The hole will be along the top fold.
Step 8
Measure 1 foot down, the side of the sheet from the top. Then make a mark. Measure the length of your arm and measure the same length as your arm from the mark you made toward the neck at a 30 degree angle. Draw a line. What you’re doing is, you are making the sleeve for your robe. Now place your yardstick at the end of the line. That is where the armpit would be. And draw a line back to the side of the sheet. What you will have is a triangle. Now cut along the two lines. Do this for the right side.
Step 9
Fold the edge of the neck opening to about 1/4 inch and press with an iron. Turn it over and press again and pin in place. Sew along the opening, with the sewing machine using a straight stitch and a seam allowance of about 1/8-inch.
Step 10
Flip the sheet so the right sides are facing each other. Then pin along the sides. Sew under the arms, beginning from the bottom of the sleeve and all through to the down side of the robe. Then stop at exactly 5 inches before the end of the sheet. Then sew using a straight stitch and a seam allowance of about 1/4-inch.
Step 11
Turn the right side out and press with an iron to flatten the seams.
Step 12
Cut out the cross from the printout. Find the center of the robe and measure down 4 inches from the neck. Then trace the cross onto the front of the robe.
Place a piece of cardboard inside the robe so that it is positioned underneath the cross. Use the fabric markers to color the cross and let the ink dry completely.
Step 13
Take out the two triangle-like sheets that were cut from the sheet to create the sleeves. Fold and iron about 1/4-inch hem on all sides.
Step 14
Then arrange the triangular pieces to form a capelet. This is done by placing the short edges on either side of the cross. Then you pin the top edges along the collar and sew.
Papal Hat
To make the hat you need to know that the costume hat is in a mitre shape, which is more recognizable than the skull cap.
Step 1
*Cut out a 14inch square shape from the poster board. Then fold one corner in toward the center of the square. Unfold the poster board to cut along the line and remove the corner.
Step 2
Decorate your costume hat with gold paint. Then make a gold band around the base of the hat with a stripe which goes up to the center. Allow the paint to dry.
Step 3
Finally, wrap the sides of the hat around your head, it doesn’t have to be too tight. The sides will overlap slightly in the back. Then mark where the pieces meet. Take off the hat and staple the pieces together on the mark. And your hat is made.
Making a pope costume is easy, you only need some basic sewing skills.